Friday, March 11, 2016

Align an format disks in 64k


You are sysadmin and someone might ask you to create a new disk or a partition in a Windows machine aligned and formatted in a different value from the default. This is valid in physical or virtual environment, of course. Here's how you can check the alignment and the cluster size of the existing partitions and also how you can create partitions with different alignments/cluster size.

Check cluster size and Partition Alignment


Check cluster size

For this you can use the fsutil command. This command gives lots of information and let us do tasks that are related to file allocation table (FAT) and NTFS file systems.


1 - Open command prompt with elevated privileges. You can take a look at the fsutil subcommands


2 - Execute the following command:
         c:\> fsutil fsinfo ntfsinfo <drive letter>

           Eg: fsutil fsinfo ntfsinfo e: 


3 - Look at the value of Bytes Per Cluster. This is the cluster size(in bytes) of the selected partition.


Check Partition Alignment
1 - Go to Start -> Execute and type msinfo32

2 - On the left side of the windows go to:
      Components -> Storage -> Disks 

3 - On the right side of the window look at Partition Starting Offset
     (You might need to scroll down to search for the partition you want to check)


Create partitions with different alignments/cluster size


Create partition with a different offset

1 - Open command prompt with elevated privileges

Run the following command

c:\> diskpart

In diskpart prompt:
  DISKPART> list disk
  DISKPART> select disk <nr> 
  DISKPART> create partition primary align=64

Now you can format the disk. The easiest way is to use Disk Management (right click in My Computer -> Manage)

Format the partition

1 - Right click the disk and choose Format...


2 - In Allocation unit size choose the value you want. You can also set a volume label and chose the File System (usually NTFS)


3 - Click OK. A warning will show up... Click ok again and you're done...


Diskpart as a lot of options. You can delete and format partitions, assign drive letters or mount points, and so on... If you want more information about it, you can check this link.

Thanks,

Wednesday, March 2, 2016

Add another NIC to VCSA6

Add another NIC to VCSA6 (vCenter Appliance 6)


The question is: Why do you need another NIC in VCSA6? Well, you might need to have a network isolated from the outside, a network for backups, replication, or something else. You might need to have a VM that needs to comunicate in an isolated manner with vcenter. The best way (and maybe the only way) to achive this is to add another nic to vCenter. If you have VCSA6, this is the way to do it:


Add a new NIC to the VCSA Appliance:

1 - Login to vsphere web client and search for the VCSA appliance
2 - Go to Manage -> Settings -> VM Hardware and press the button Edit..


3 - At the bottom of the Window, add a New Device (Network)


4 - In the new network adapter, select the vlan you want and hit the OK button. Don't forget to check if the Connected at Power On checkbox is checked

A new virtual nic is added to the VM. Next we have to configure the network settings for this new nic..


Configure the new network adapter in the VCSA6 Appliance

Login to VCSA Appliance Admin page https://<VCSA ip>:5480 with the user "root"


In the left side go to Networking and you will see nic1 in the Networking Interfaces


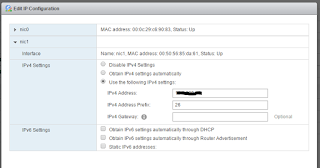
In the right side of Networking interfaces click in the Edit... button. A popup window will show up, here you can configure the IP address of the new nic. 


Be aware with two things: 
  • The network mask must be in the /xx form (example: 255.255.255.192 -> 26)
  • The appliance does not support more than one default gateway, so this new nic cannot have a gateway.


Adding and configuring a second nic in VCSA 6 is very easy to do. You just have to add a second nic to the appliance VM, go to VCSA Admin page and configure the IP. Of course, if you want to add a third nic, the process is the same...

If you have a VCSA 5 it's a more tricky thing to do. Take a look at Rafal's Post: Add nic to VCSA5 

Thanks,

Tuesday, March 1, 2016

Virtualization Topics


Here I will post several tutorials about virtualization...